Kubernetes Networking : Part 2 : Guide to Kubernetes Service Type
Demystifying ClusterIP, NodePort, LoadBalancer, Headless, and ExternalName with Real-World Use Cases.
In the previous blog, we explored the fundamentals of Kubernetes Services, where we discussed how Pods communicate with each other, the role Services play, and how the communication actually works behind the scenes. If you are new to this topic, I would highly recommend going through the Kubernetes Fundamentals and Kubernetes Networking – Part 1 blogs first, as they will help you better understand the concepts we will discuss here.
That being said, in this blog, we will dive deeper into the different types of Services Kubernetes provides and understand when and why to use them in real world scenarios.
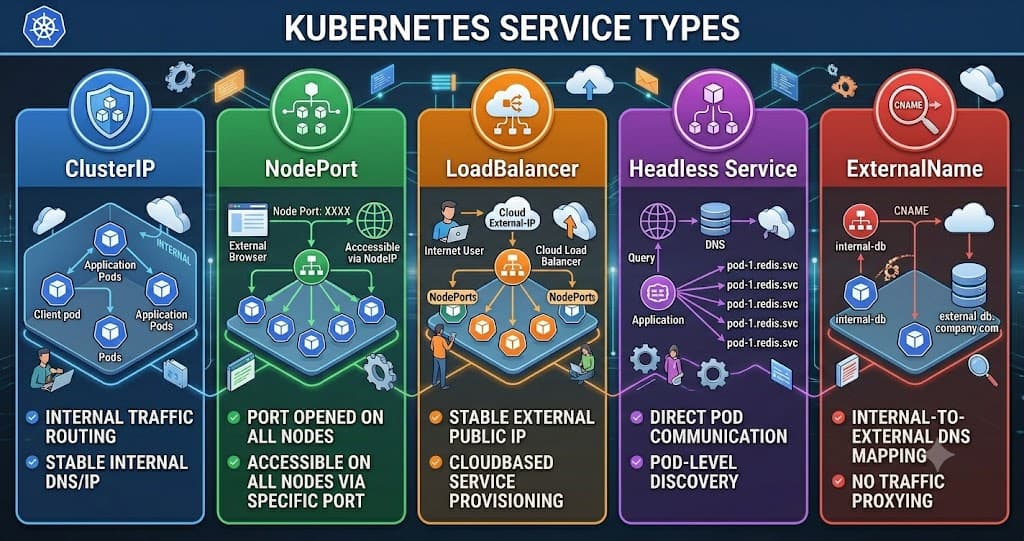
Kubernetes Services Types
We already know the purpose of a Kubernetes Service it provides a stable DNS name and a stable IP address, allowing communication to happen seamlessly without interruption.
We also learned that Pods cannot have stable IPs because of their ephemeral nature. A Pod can be terminated, recreated, or rescheduled at any time, which means its IP address can change. This is exactly why we place a Service on top of a Pod or Deployment to provide a stable entry point (stable IP and DNS) so applications can continue communicating regardless of what happens at the Pod or Deployment level.
Now that we understand why Services are needed, let’s look at the different Service types Kubernetes provides.
Kubernetes offers five types of Services, and each of them is designed for a specific purpose and use case. At the time of writing, Kubernetes provides the following Service types:
ClusterIP (Default)
NodePort
Load Balancer
Headless Service
ExternalName
Each Service type solves a different networking problem. Some are meant for internal communication within the cluster, while others help expose applications externally.
In the upcoming sections, we will explore each Service type in detail, understand how they work behind the scenes, and discuss when to use them in real-world scenarios.
Cluster IP
This is the default Service type available in Kubernetes. If you do not explicitly specify a Service type, Kubernetes automatically creates it as a ClusterIP Service.
What it is ?
ClusterIP is a Service type that enables internal communication within the Kubernetes cluster. Instead of directly communicating with Pods using their changing Pod IPs, applications communicate through a stable Service IP and DNS name.
As we learned earlier, Pods are ephemeral in nature they can be recreated, restarted, or rescheduled at any time, which means their IP addresses may change. Kubernetes solves this problem by placing a ClusterIP Service in front of the Pods.
Behind the scenes, kube-proxy updates networking rules so traffic sent to the Service IP is automatically routed to the healthy backend Pods.
One important caveat here is that the application is not exposed to the public internet. Communication through a ClusterIP Service is restricted only within the cluster.
When this is used?
This is the most commonly used Service type in Kubernetes. In real world deployments, most applications run internally using ClusterIP Services.
But wait… if applications are internal, how do users access them?
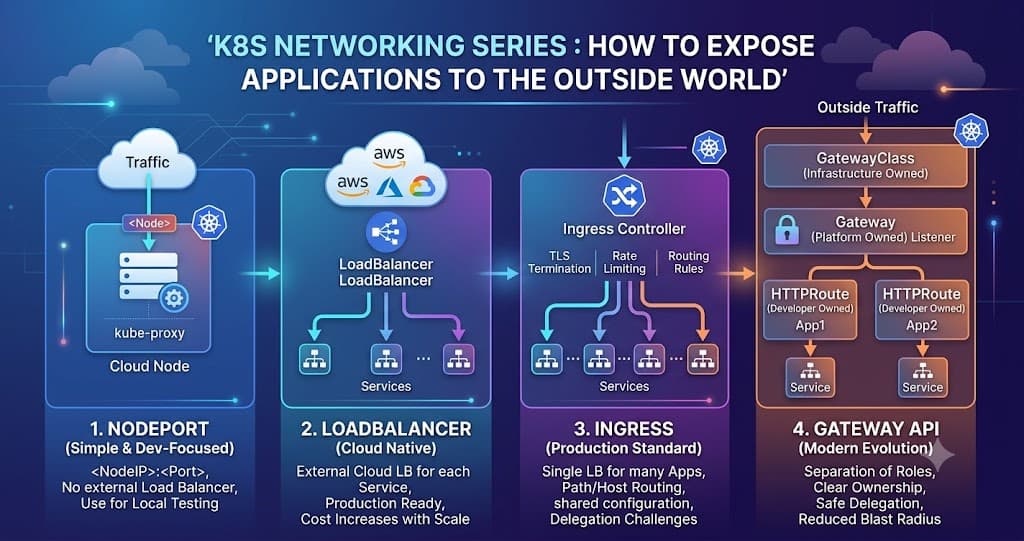
This is where components like Ingress, Gateway API, Load Balancers, or NGINX come into the picture. Instead of exposing every application individually, organizations usually expose a common entry point that routes traffic internally to multiple ClusterIP Services.
Why is it done this way? There are multiple reasons for this approach:
Cost optimization – Exposing every Service through a LoadBalancer can significantly increase infrastructure costs.
Better traffic control – A central entry point gives teams more control over routing, authentication, rate limiting, and security.
Avoid operational issues – Using NodePort for every application can lead to port management and conflict issues.
Because of these reasons, most organizations keep applications internal using ClusterIP and expose only selected endpoints externally through Ingress Controllers, Gateway APIs, or Load Balancers.
Try it yourself :
You can follow the practical example here to see how a ClusterIP Service works in action and understand how Pods communicate through a stable Service endpoint.
Node Port
This type of Service is mainly used for local testing, lab setups, or Proof of Concepts (PoCs). It is not very common in production environments, although there are some edge cases where teams still use it.
NodePort exposes an application outside the Kubernetes cluster by opening a specific port on every node in the cluster.
What it is ?
When you create a Service with the NodePort type, Kubernetes exposes your application externally using a port on the node.
This means you can access the application using: <NodeIP>:<NodePort>. For example: 192.168.1.10:30080.
By default, Kubernetes allocates a port from the 30000–32767 range, although you can manually specify a port if needed.
Behind the scenes, Kubernetes creates a ClusterIP Service first, and then the NodePort Service extends it by exposing that application externally through the node.
But wait… what if my Pods are running on different nodes?
Good question 🙂
Imagine your application Pod is running only on Node 2, but you accidentally access the NodePort of Node 1. Will it fail? No.
When Kubernetes creates a NodePort Service, the same port is opened on all nodes in the cluster. If traffic reaches a node where the Pod is not running, kube-proxy forwards the request internally to a healthy Pod running on another node.
For example:
Node 1 → No Pod running
Node 2 → Pod running
Node 3 → No Pod running
If you access: http://Node1IP:30080.The request will still work because Kubernetes internally forwards it to the Pod running on Node 2. This is one of the reasons why NodePort feels simple to use during testing.
One important caveat:
Although NodePort exposes applications externally, it is usually not ideal for internet facing production applications.
Why?
Ports are limited and need manual management.
You expose node level networking directly.
Security becomes harder to manage.
You need to know node IP addresses.
Scaling and routing become difficult compared to using Ingress or Load Balancers.
When this is used?
NodePort is mostly used for:
Local testing
Learning Kubernetes
Lab environments
Proof of Concepts (PoCs)
Temporary external access during debugging
In production environments, teams usually prefer LoadBalancer Services, Ingress Controllers, or Gateway APIs instead of directly exposing applications through NodePort.
Try it yourself :
Let’s create a simple NodePort Service and see how it works.
Step 1: Create an NGINX Deployment
#Create a file called `nginx-deployment.yaml`
apiVersion: apps/v1
kind: Deployment
metadata:
  name: nginx-app
spec:
  replicas: 2
  selector:
    matchLabels:
      app: nginx-app
  template:
    metadata:
      labels:
        app: nginx-app
    spec:
      containers:
        - name: nginx
          image: nginx
          ports:
            - containerPort: 80

---
#Create a file called nginx-nodeport.yaml
apiVersion: v1
kind: Service
metadata:
  name: nginx-nodeport
spec:
  type: NodePort
  selector:
    app: nginx-app
  ports:
    - port: 80
      targetPort: 80
      nodePort: 30080
---

#Apply it using following command
kubectl apply -f nginx-nodeport.yaml

#Check the Service
kubectl get svc

#Check nodes
kubectl get nodes -o wide

#Now Access
http://<NodeIP>:30080

# Try different node IPs, even nodes where the Pod is not running.
You can inspect the Service: kubectl describe svc nginx-nodeport
Check endpoints: kubectl get endpoints
This helps you understand which Pods are backing the Service.
Load Balancer
This is one of the most commonly used Service types in production grade Kubernetes environments to expose applications to the outside world.
But wait… does that mean every application gets its own Load Balancer? Not really.
As we discussed earlier, exposing every application using a LoadBalancer Service can become very expensive because each Load Balancer typically provisions a public IP and cloud resources.
You might be wondering: Then how do companies expose applications externally in production? Good question 🙂
In the real world, organizations usually expose only a few components such as Ingress Controllers (NGINX, Traefik, HAProxy, etc.) or Gateway APIs using a LoadBalancer Service.
Then, all application traffic is routed internally through these components to the actual backend services running as ClusterIP Services.
This approach helps organizations:
Reduce infrastructure cost
Centralize traffic management
Improve security
Manage routing in a scalable way
Instead of provisioning 50 Load Balancers for 50 applications, companies usually use one or a few Load Balancers and route traffic internally.
What it is ?
A LoadBalancer Service exposes your Kubernetes application to the public internet.
When you create a Service with the type LoadBalancer, Kubernetes works with the underlying cloud provider (AWS, Azure, GCP, etc.) to provision an external Load Balancer and assign a public IP address (or DNS endpoint).
This public endpoint becomes the entry point through which users can access your application. For example: http://<External-IP> or http://my-app.company.com
Behind the scenes, Kubernetes creates:
LoadBalancer → NodePort → ClusterIP → Pod
Did you notice it ? Yes, you read that right 🙂. A LoadBalancer Service internally uses NodePort.
Here is how the traffic flow works:
The external Load Balancer receives incoming traffic.
It forwards traffic to the NodePort opened on cluster nodes.
kube-proxy routes the request to the appropriate ClusterIP Service.
Finally, the traffic reaches a healthy backend Pod.
This is why when you create a LoadBalancer Service, you may notice a NodePort also getting created automatically.
One important thing to remember. A LoadBalancer Service works differently depending on where Kubernetes is running. In cloud managed Kubernetes environments such as: AWS EKS, Azure AKS, Google GKE
When is this used?
Use a LoadBalancer Service whenever you want to expose an application externally.
Typical use cases include:
Public facing web applications
APIs exposed to external consumers
Applications requiring external access
However, in production, teams usually avoid assigning a separate Load Balancer to every application. Instead, they expose Ingress Controllers or Gateway APIs through a LoadBalancer and route traffic internally to backend services.
Try it yourself
You can follow the practical guide linked below to create a LoadBalancer Service, understand how it works internally, and see how Kubernetes exposes applications externally.
Headless Service
This is one of the most misunderstood Service types in Kubernetes. It is called Headless service because it doesn't have a stable Service IP which we used to have in all other services. At first glance, you may wonder:
Wait… why would anyone want a Service without a Service IP?
Good question 🙂
A Headless Service is mainly used when applications need to directly communicate with individual Pods, instead of a load-balanced Service endpoint.
What is it?
In a normal Kubernetes Service (ClusterIP), traffic flows like this: Application → Service IP → One of the Pods
Kubernetes automatically load balances requests across Pods. But in some cases, applications want to know:
Which exact Pod am I talking to?
For such scenarios, Kubernetes provides Headless Services. A Headless Service is created by setting: clusterIP: None
This tells Kubernetes: “Do not assign a Cluster IP. Give me direct Pod-level access.”
Instead of returning a single Service IP, Kubernetes DNS returns the individual Pod IPs behind the Service. For example:
Instead of:
my-app.default.svc.cluster.local → 10.96.10.20
You may get:
pod-1.my-app.default.svc.cluster.local
pod-2.my-app.default.svc.cluster.local
pod-3.my-app.default.svc.cluster.local
Why do we need this?
Let’s understand this with a simple Redis example. Assume you are running Redis in Kubernetes with:
redis-0 → Primary (Leader)
redis-1 → Replica
redis-2 → Replica
Now imagine you expose Redis using a normal ClusterIP Service.
What happens? A normal Service will load balance traffic randomly across all Redis Pods. So your application may connect like this:
Request 1 → redis-0 (Primary)
Request 2 → redis-2 (Replica)
Request 3 → redis-1 (Replica)
This becomes a problem.
Why? Because in Redis:
Writes must go to the Primary node
Reads may go to Replicas
Replicas synchronize data from the Primary
If Kubernetes randomly sends traffic to any Redis Pod through a normal Service, your write requests may accidentally land on a Replica, which is not what we want.
So how do we solve this?
This is where Headless Services become useful.
Instead of giving one load-balanced Service IP, Kubernetes exposes the individual Pod DNS records.
For example:
redis-0.redis.default.svc.cluster.local
redis-1.redis.default.svc.cluster.local
redis-2.redis.default.svc.cluster.local
Now the Redis cluster (or your application) can directly talk to the specific Pod it wants. So here the app or the Redis Cluster will decide which one to use rather Kubernetes deciding for you.
For example:
Write traffic →
redis-0(Primary)Read traffic →
redis-1orredis-2(Replicas)
This gives applications full control over which Pod they communicate with.
And this is exactly why Headless Services are commonly used with StatefulSets and databases.
In short:
If your application needs Pod level awareness, a normal Service may not be enough and that is where Headless Services shine 🙂
When is this used?
Headless Services are commonly used with:
StatefulSets
Distributed databases
Clustered applications
Messaging systems
Peer-to-peer communication between Pods
In most regular stateless applications, you probably do not need Headless Services. A standard ClusterIP Service is usually enough.
Try it yourself
You can follow the practical guide to create a Headless Service, understand how it works.
ExternalName
This is probably the least commonly used Service type in Kubernetes, but it can still be very useful in certain situations. Unlike other Service types, ExternalName does not create a ClusterIP, NodePort, or LoadBalancer.
Wait… then what exactly does it do? An ExternalName Service simply acts as a DNS alias (mapping) inside Kubernetes. Instead of routing traffic to Pods inside the cluster, it redirects requests to an external DNS name.
What is it?
Imagine your application running inside Kubernetes needs to communicate with an external database, API, or third-party service.
Normally, your application would directly call: mydb.company.com
But what if the endpoint changes later? You would need to update configurations in multiple places.
This is where ExternalName becomes useful. You can create a Kubernetes Service that maps:
database-service.default.svc.cluster.local
to:
mydb.company.com
Now your application continues using the Kubernetes Service name, while Kubernetes redirects the request to the external DNS.
Behind the scenes, Kubernetes simply returns a CNAME DNS record. There is no proxying, no kube-proxy rules, and no Service IP involved.
Example
Suppose your payment service db is running outside Kubernetes: mydb.abc123.us-east-1.rds.amazonaws.com. Instead of hardcoding it in multiple applications, create an ExternalName Service:
apiVersion: v1
kind: Service
metadata:
  name: payment-service-db
spec:
  type: ExternalName
  externalName: mydb.abc123.us-east-1.rds.amazonaws.com
Now applications inside Kubernetes can simply access: payment-service-db.default.svc.cluster.local. Kubernetes will automatically redirect traffic to: mydb.abc123.us-east-1.rds.amazonaws.com
When is this used?
ExternalName is commonly used when:
Connecting Kubernetes apps to external databases
Connecting to third-party APIs
Migrating workloads gradually to Kubernetes
Avoiding hardcoded external URLs in applications
Creating consistent service naming conventions
One important caveat:
Since this only works using DNS mapping, Kubernetes does not perform load balancing or health checks. If the external service is unavailable, Kubernetes cannot help much because the traffic is going directly to the external endpoint.
So think of this more like a DNS shortcut rather than a traditional Kubernetes Service.
You might now wonder: If this is useful, why do many teams not use it often?
Good question 🙂 In real-world production environments, many organizations prefer using:
Environment variables
Centralized configuration management
Service discovery tools
API gateways or service meshes
instead of relying on ExternalName. Why?
Because ExternalName has a few limitations:
No traffic control – Kubernetes cannot route or balance traffic.
No observability – Monitoring and tracing become harder.
No failover mechanism – If the external endpoint fails, Kubernetes cannot automatically redirect traffic.
DNS dependency – Everything depends on proper DNS resolution.
Also, many modern architectures already manage external endpoints through configuration management systems, making ExternalName less necessary.
Conclusion
That brings us to the end of this blog. In this blog, we explored the different types of Kubernetes Services and understood why each Service type exists and what problem it solves.
We started with ClusterIP, the default Service type used for internal communication inside the cluster. Then we looked at NodePort, which helps expose applications externally for testing and lab environments. After that, we explored LoadBalancer, one of the most common approaches used in production to expose applications to the outside world.
We also discussed ExternalName, which acts more like a DNS mapping for external dependencies, and finally Headless Services, which are useful when applications need direct Pod-level communication instead of load balancing.
One important thing to remember is:
There is no “best” Service type in Kubernetes.
The right Service depends entirely on your use case, traffic pattern, security requirements, and architecture design.
For example:
Need internal communication? → ClusterIP
Need quick testing access? → NodePort
Need external exposure? → LoadBalancer
Need external DNS mapping? → ExternalName
Need Pod-level discovery? → Headless Service
Also, in real world production environments, you will rarely see applications directly exposed using NodePort or individual LoadBalancers. Most organizations combine these Service types with Ingress Controllers or Gateway APIs to manage traffic in a more scalable and cost-effective way.
Now that we understand how Services work and the different ways applications are exposed, in the upcoming blogs we will dive deeper into Ingress, Gateway API, kube-proxy, and Kubernetes traffic flow behind the scenes.
Until then, try out the practical examples, break things, experiment, and most importantly learn by doing 🙂