Kubernetes Networking : Part 3 : How to Expose Applications to the Outside World
Exploring Methods to Expose Your Kubernetes application to the public internet Safely, Securely and Efficiently
Search for a command to run...
Exploring Methods to Expose Your Kubernetes application to the public internet Safely, Securely and Efficiently
No comments yet. Be the first to comment.
Kubernetes in Detail is a comprehensive series that explains Kubernetes from the ground up. It covers all core and advanced Kubernetes concepts in depth, with clear explanations and practical insights.
A deep dive into Path-Based vs. Host-Based routing, the difference between Ingress resources and controllers, and how to optimize your K8s cluster networking.
Learn the difference between an AI's context window and attention horizon, why models get lost in the middle, and how to optimize your prompts.

Understanding Tokens, BPE, and LLM Costs

A beginner friendly guide to understanding GatewayClass, Gateways, and HTTPRoute with a hands on Cilium lab.
A deep dive into Path-Based vs. Host-Based routing, the difference between Ingress resources and controllers, and how to optimize your K8s cluster networking.
On this page
In our previous blogs, we explored how Kubernetes networking is structured, the role of Services, and the different types of Services Kubernetes offers.
If you are new to this series, I highly recommend checking out the previous networking blogs first. At least having a basic understanding of Kubernetes networking and Services will help you follow along much better in this blog. That said, if you already have some experience and know the basics of networking and Kubernetes Services, feel free to continue from here 🚀
In this blog, we will explore one of the most important topics in Kubernetes networking:
How do we expose applications to the outside world?
Because let’s be honest 😄 Running an application inside a Kubernetes cluster is one thing. But making it accessible to users securely and efficiently? That is where things start getting interesting.
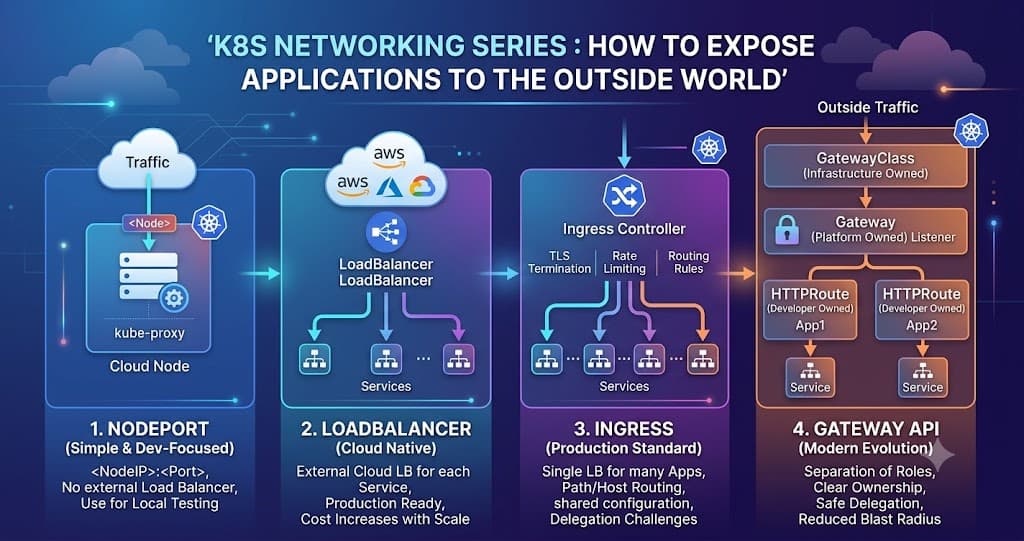
We will explore the different ways Kubernetes allows us to expose applications, including:
NodePort — the simplest way to expose applications
LoadBalancer — cloud-native exposure using external Load Balancers
Ingress — the production-friendly and cost-effective approach
Gateway API — the modern evolution of Kubernetes traffic management
We will also discuss:
When to use each option
Their pros and cons
Why some approaches work better than others in production environments
By the end of this blog, you will have a solid understanding of the different ways applications are exposed in Kubernetes and when to choose each approach.
So grab your coffee ☕, let’s get started!
Let’s start with the most basic and simplest approach.
This is one of the simplest ways to expose your application to the outside world.
As the name suggests, Kubernetes exposes your application using a port on the cluster node itself.
Here, we use a Service of type NodePort. Kubernetes opens a specific port on every node in the cluster, and traffic hitting that port gets forwarded to your application.
For example, imagine your application is exposed on port 30080. This means: <NodeIP>:30080 can be used to access your application.
One important thing to remember here is: Even if your application is running only on one node, Kubernetes exposes the same port on all nodes in the cluster.
So what happens if traffic reaches the “wrong” node where your application is not running? No worries our friend kube-proxy takes care of this for us 🚀
kube-proxy is responsible for forwarding the traffic to the correct Pod, even if the request initially lands on a node where your application is not hosted.
In short: Request → Any Cluster Node → kube-proxy → Correct Pod
Sounds simple, right? Well… yes, but there are a few catches 😄. You will get to know in Cons section.
Easy to implement
Useful for local testing and quick demos
No external Load Balancer required, making it cost-effective
Not ideal for production grade deployments
Port conflicts can become a headache
Managing and remembering ports is difficult as applications grow
Exposes high numbered ports, which is not very user friendly
Rarely used in production; mostly useful for local testing or debugging
So while NodePort is great to get started, it is usually not the preferred approach for production environments. And this is where more advanced approaches like LoadBalancer, Ingress, and eventually Gateway API start becoming important.
After NodePort, the next common option to expose applications is using a LoadBalancer Service. This is one of the more cloud native ways of exposing applications to the outside world.
But there is one catch here 👀
This approach mainly works when your Kubernetes cluster is hosted on a cloud provider such as AWS, Azure, or GCP because Kubernetes depends on the cloud provider to provision an external Load Balancer for you.
The idea here is pretty straightforward.
Instead of exposing your application directly through a node port, Kubernetes creates a Cloud Provider Load Balancer and connects external traffic to your application through it.
For this, we use a Service of type LoadBalancer.
Once you create a LoadBalancer Service, Kubernetes communicates with the cloud provider and automatically provisions a Load Balancer for your application.
Behind the scenes, the flow looks something like this:
Internet → Cloud Load Balancer → Kubernetes Service → Pod
For example:
In AWS, Kubernetes can provision an NLB (Network Load Balancer) by default
In Azure, it creates an Azure Load Balancer
In GCP, it provisions a Google Cloud Load Balancer
The best part?
You don’t have to manually create or configure the Load Balancer yourself. Kubernetes handles it automatically (provided your cluster has the necessary permissions).
Sounds perfect, right? Well… not exactly 😄
Here comes the biggest downside.
For every application exposed using a LoadBalancer Service, Kubernetes generally creates a separate external Load Balancer.
Let’s say:
You have 10 applications → you may end up with 10 Load Balancers
You have 100 applications → yes, potentially 100 Load Balancers 😅
And as we all know, cloud Load Balancers are not cheap. This makes the approach expensive and difficult to scale for large environments.
Easy to implement
Production-ready and widely used
Direct real-world connectivity to applications
Secure when configured properly (TLS, security groups, firewall rules, etc.)
Can become very expensive at scale
Each application may get its own Load Balancer
Managing many Load Balancers becomes operationally difficult
Less cost-efficient for microservices architectures with many apps
So while LoadBalancer Services are great and production ready, using them for every application is usually not the most scalable or cost effective approach.
And this is exactly where solutions like Ingress and later Gateway API start becoming really interesting 🚀
This is probably the most common and heavily used method in production environments to expose applications to the outside world.
In the previous section, we saw one major problem with LoadBalancer Services: Every application gets its own Load Balancer. And as we know, cloud Load Balancers are expensive 💸
So naturally, the question becomes:
What if we use one Load Balancer for multiple applications?
Well… that is exactly the problem Ingress solves 😄
Before we understand Ingress, there is one important thing to clarify.
Ingress ≠ Ingress Controller
These are two different things.
Ingress is a Kubernetes resource (just like Deployment or Service).
It contains the routing rules:
Which application should receive traffic?
Which hostname should map to which service?
Which path should go to which application?
Think of it as a traffic routing configuration file.
The Ingress Controller is the actual application that reads the Ingress configuration and performs the routing. Instead of relying completely on cloud native routing logic, the Ingress Controller uses technologies like:
NGINX Ingress Controller (one of the most widely used options, but officially retiring in March 2026)
Traefik
HAProxy
Istio Ingress Gateway
And many more...
These tools take care of traffic routing, TLS termination, filtering, rate limiting, and much more.
Note: The Kubernetes community announced the retirement of the Ingress-NGINX project. Best-effort maintenance continues until March 2026, after which there will be no new releases, bug fixes, or security updates. Existing deployments will continue to work, but organizations are encouraged to plan migrations to alternatives such as Gateway API-compatible solutions.
Good question 👀
You might remember:
By default, applications inside Kubernetes use ClusterIP, which cannot be accessed from outside the cluster.
So how does Ingress solve this? Here is the trick:
The Ingress Controller itself is exposed using a LoadBalancer Service. That means: Instead of creating 100 Load Balancers for 100 applications, we create:
1 Load Balancer → 1 Ingress Controller → Many Applications
Much cheaper 😄
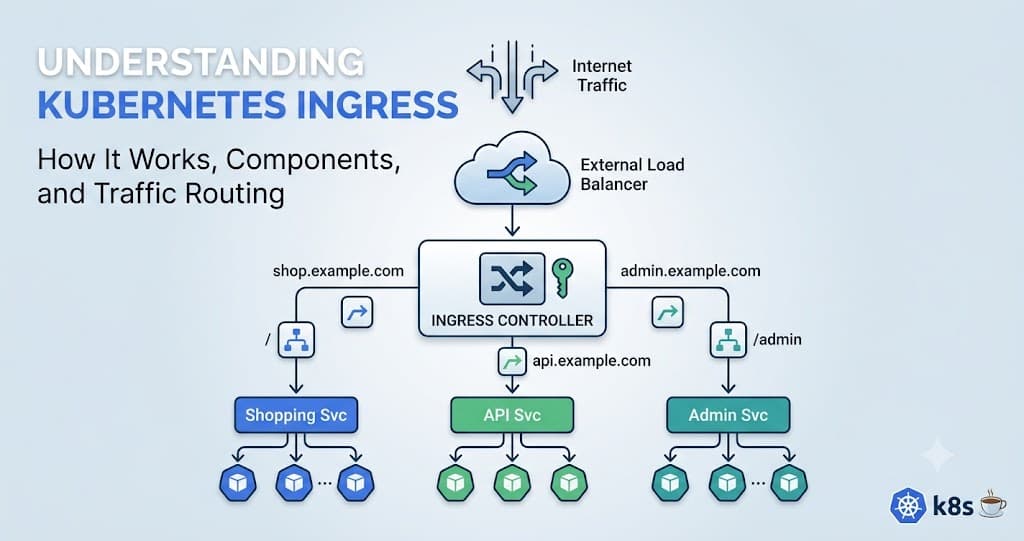
The traffic flow looks like this:
Internet → External Load Balancer → Ingress Controller → Application Service → Pod
So all incoming traffic enters through the Ingress Controller, and then the controller decides: Which application should receive this request?
How Does Ingress Know Where to Route Traffic? Another great question 😄
We define this using an Ingress resource which is deployed along with the application resources such as deployment or service as one of the resource. Each application can have its own Ingress manifest, which tells Kubernetes:
Which hostname to listen for
Which path to match
Which service should receive traffic
Which Ingress Controller to use
Traffic routing in an Ingress is typically handled in two ways: Path based Routing and Host based Routing. These routing strategies help direct incoming requests to the appropriate services based on the URL path or hostname.
For now, just understand that an Ingress routes incoming traffic to the correct application using one of these techniques. We’ll explore both routing methods in more detail in a separate blog post.
# API Version of the Ingress resource
apiVersion: networking.k8s.io/v1

# We are creating an Ingress object
kind: Ingress

metadata:
  # Name of the Ingress
  name: demo-ingress

spec:
  # Which ingress controller should handle this
  ingressClassName: nginx

  rules:
    # Hostname to match
    - host: app.example.com
      http:
        paths:
          # URL path to match
          - path: /

            # Match everything under "/"
            pathType: Prefix

            backend:
              service:
                # Service to route traffic to
                name: my-app-service

                port:
                  # Service port number
                  number: 80
What this manifest says is: If traffic comes to app.example.com, send it to my-app-service on port 80.
Ingress is not just about routing traffic. It also provides many production grade features like:
TLS Termination: Users access applications securely using HTTPS, while Ingress handles SSL/TLS for us.
Rate Limiting: Prevent abuse by limiting requests. i.e Stop someone from sending 10 million requests in 5 minutes 😅
Traffic Filtering: Block unwanted traffic based on headers, IPs, rules, etc.
Authentication Integrations: Can integrate with OAuth, SSO, Identity Providers, and more.
Basically, Ingress becomes the front door of your Kubernetes cluster 🚪
Very cost-effective compared to individual LoadBalancers
One external Load Balancer can serve many applications
Production-ready and widely adopted
Supports TLS termination
Supports rate limiting and traffic filtering
Multiple controller options available
One component ends up handling many responsibilities
Can become a bottleneck if not designed properly
If the Ingress Controller fails, many applications may be affected
Limited delegation model — platform teams manage controllers while developers often need routing changes, causing dependency
And this exact limitation around ownership, flexibility, and delegation is one of the biggest reasons Gateway API was introduced 🚀
So far, we explored:
NodePort → Simple but not production friendly
LoadBalancer → Production ready but expensive
Ingress → Cost-effective and production-ready
At this point, you might be wondering:
If Ingress already solves the problem, why do we even need Gateway API? 🤔
Fair question 😄
Gateway API is the modern and more flexible way of managing traffic into Kubernetes clusters.
At a high level, it still follows a similar architecture as Ingress: under the hood, it still uses a small number of Load Balancers and routes traffic through them.
Then what changed? The answer is simple:
Better separation of responsibilities and better delegation.
And trust me this becomes a huge deal in real production environments 😄
Ingress works. No doubt about that. But over time, teams realized it has some important limitations.
One Component Handles Too Many Responsibilities
Ingress Controllers usually handle: Load balancing, TLS termination, Rate limiting, Traffic filtering, Authentication, Routing
Basically One component doing many jobs.
This is manageable initially, but at scale it becomes harder to maintain and customize.
Limited Delegation Model (The Real Production Pain 😅)
Let’s understand this with a real-world example. Assume you are a DevOps Engineer. You:
Deploy the Ingress Controller
Configure networking rules
Create Ingress resources for applications
Now imagine a developer comes and says: "Hey, I need to update my route."
For Example
/payments → /payments-v2
Can the developer directly update the Ingress configuration? Usually… No 👀
Why ? Because Ingress is shared infrastructure.
If routing is path-based, You must ensure:
No other application is already using the same path
Existing routes do not break
If routing is host-based, You must ensure:
The hostname is unique
TLS and DNS configurations remain correct
And here comes the scary part 😅. A small mistake by one team can accidentally impact many other applications, because everyone is sharing the same Ingress Controller.
This creates: Developer → Raise Request → DevOps Review → Cross Verification → Deployment
And suddenly even a small routing change becomes a ticket, approval process, and deployment delay 😅 . This is one of the biggest pain points Gateway API was designed to solve.
Gateway API separates responsibilities into independent resources.
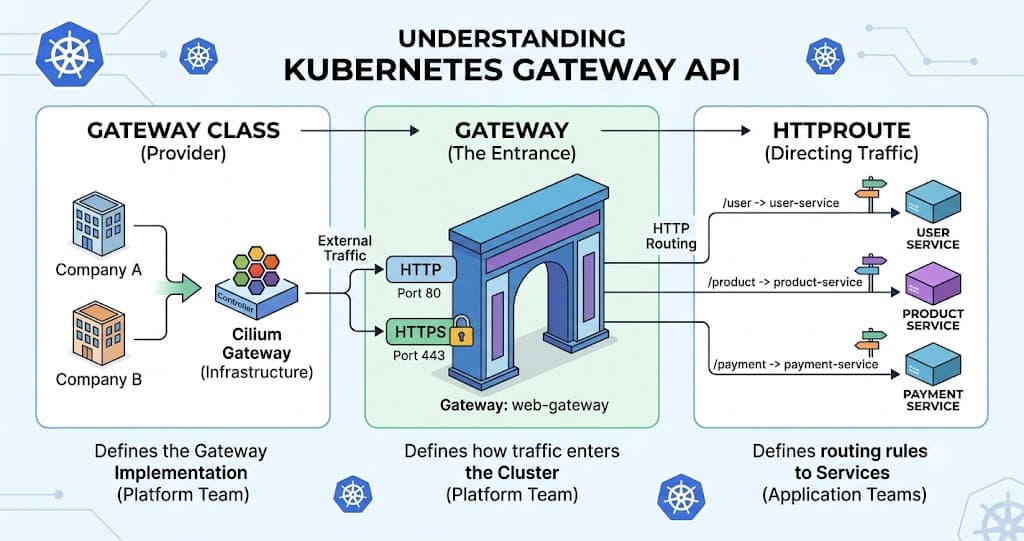
Instead of one big Ingress object handling everything, Gateway API breaks things into smaller, manageable components. The main components are:
GatewayClass
Gateway
HTTPRoute
Each component can be owned and managed by different teams. This separation is what makes Gateway API powerful.
This defines: Which Gateway implementation/tool should be used
Just like Ingress had multiple controllers (NGINX, Traefik, etc.), Gateway API also supports different implementations. Some popular options include:
Cilium
Istio
Calico
Envoy Gateway
Kong
Think of this as: "Which engine are we using under the hood?". For example: We chose Cilium as our Gateway implementation.
You can technically have multiple GatewayClasses for different teams or business units. Although possible, keeping too many GatewayClasses is usually not considered best practice unless there is a strong reason.
Ownership: This is usually managed by the Infrastructure Team. Because platform wide networking decisions are generally centralized.
This is similar to the Ingress Controller layer. The Gateway defines:
Which listeners to expose (HTTP, HTTPS)
Which ports to open
Which domains to allow
Which GatewayClass to use
Think of this as: The actual traffic entry point into the cluster.
Example:
You may have:
Public Gateway → Internet-facing → Strong TLS → Rate limiting
and
Internal Gateway → Internal traffic only → Relaxed restrictions
Ownership: Usually managed by the Platform Team or DevOps Team. Because this still affects cluster wide networking behavior.
This is where things get interesting 😄
HTTPRoute is the equivalent of the Ingress resource, but with one major improvement: It can be safely delegated to developers.
Here developers define:
Hostnames
Paths
Backend Services
Traffic rules
And simply attach the route to an approved Gateway.
Example: /payments → payment-service . The developer can manage their own routing without touching shared infrastructure. And trust me… this is huge 🚀 Because now:
Developers Can Move Independently: Developers no longer need to depend on DevOps teams for every small routing update.
Want to add a new endpoint?, Want to change a path?, Want to update service mapping?
They can manage it themselves through their own HTTPRoute resource.
Reduced Blast Radius:
But wait…
How exactly does Gateway API reduce the blast radius? This will also
Let’s understand this with a real world example 😄. This will also help you to understand how Developers Can Move Independently
In most organizations using traditional Ingress, teams commonly share host such as: api.company.com and use path-based routing to route traffic to different applications. Something like this:
/payments → payment-service
/users → user-service
/orders → order-service
Now here comes the problem 👀. In many cases, all these routes live inside the same shared Ingress resource file. That means if the Payments team wants to make a change, they are editing a file that also contains routes for: Users Service, Order Service etc.
Now imagine someone accidentally:
Updates the wrong route
Creates a conflicting path
Adds /orders without realizing it already exists
Changes path priority incorrectly
Suddenly: Payments issue → Orders affected → Users affected → Unexpected production issue 😨
Why? Because everything is tightly coupled inside a shared Ingress configuration. This increases the blast radius. A small mistake from one team can potentially impact multiple services. And trust me this happens more often than people admit 😅
With Gateway API, teams are encouraged (and mostly forced by design) to create separate HTTPRoute resources for each application.
Even if everyone is still using: api.company.com with path-based routing, each application owns its own independent routing file. Example
payment-httproute.yaml
users-httproute.yaml
orders-httproute.yaml
Now if the Payments team makes a bad change they only touch payment-httproute.yaml if any issue only gets payment service gets affected. The users and orders routes continue working normally because their configurations are completely isolated. So now the blast radius becomes:
Ingress → One bad config can affect many apps 😨
Ingress → One bad config can affect many apps 😨 Gateway API → Mostly isolated to one app 😌
This is one of the easiest ways to remember why Gateway API improves both delegation and reliability in shared Kubernetes environments.
Better separation of responsibilities
Clear ownership model across teams
Safer delegation to developers
Reduced blast radius during failures
More flexible and expressive routing rules
Standardized Kubernetes-native API
Supports advanced traffic management
Easier to scale for large organizations
More components to understand initially
Slight learning curve compared to Ingress
Ecosystem is still evolving in some areas
Not every controller supports all Gateway API features equally
Not necessarily. Ingress is still heavily used and works perfectly fine for many organizations.
But if you are dealing with:
Multiple teams
Shared clusters
Complex routing needs
Delegation challenges
Gateway API becomes a much cleaner and scalable option.
Exposing your applications to the outside world isn't a one size fits all decision. As we've seen, Kubernetes networking has evolved to solve real world operational headaches:
NodePort is your quick and dirty tool for local debugging and testing.
LoadBalancer gives you robust, cloud native connectivity but comes with a hefty price tag at scale.
Ingress solves the cost problem by putting multiple apps behind a single cloud load balancer, but it can introduce operational bottlenecks and shared configuration risks.
Gateway API is the modern evolution, breaking down those bottlenecks by splitting responsibilities so infrastructure, platform, and development teams can move independently without stepping on each other's toes.
If you are running a small project or a single app, Ingress or a simple LoadBalancer might be all you ever need. But if you are scaling across multiple teams in a shared cluster, adopting the Gateway API will save you from a lot of configuration conflicts and deployment delays down the road. 🚀
We’ve covered the high level architecture and the why behind each approach, but we’re just scratching the surface!
To really get deep into these tools, we need to look under the hood. In our upcoming posts, we will explore each of these options in deep, technical detail in separate blogs, including step by step implementation guides, YAML manifests, and production best practices.
Stay tuned for the next part, where we’ll roll up our sleeves and dive deep into each of these options! Until then, happy routing! ☕